Quick Answer
To test soil with pH strips accurately: mix 1 part soil with 1 part distilled water, let it settle 5 minutes, dip the strip for the manufacturer’s stated time (usually 10–30 seconds), then read the color on a white matte paper under neutral 5000K–6500K daylight lighting. Never read under yellow bulbs, direct sun, or on a dark surface. If the color falls between two chart values, record it as a range (e.g., pH 6.0–6.5) rather than guessing.
If you want to test soil with pH strips, the hardest part is usually not the soil, the strip, or the water. It is the color reading. Many gardeners get inconsistent results when using pH strips to test soil because they compare the strip under yellow kitchen lighting, in harsh sunlight, or while the strip is sitting on dark soil or a dirty countertop. The result is a reading that looks “greenish,” “bluish,” or “somewhere between 6 and 7,” but never feels certain.
This guide explains how to test soil pH with test strips in a way that reduces color confusion. You will learn how to prepare the soil sample correctly, why lighting is the biggest failure point, how to use a white piece of paper as a backdrop, how to avoid direct sunlight glare, and how to use a smartphone color-calibration app if you are colorblind or struggle to see subtle green and blue shifts.
Key Takeaways
- Use narrow-range pH strips (pH 4–9), not broad universal strips, for garden soil.
- Always use distilled water; tap water minerals skew results by 0.5–1.0 pH units.
- The #1 error is reading color under warm/yellow indoor lighting or direct sun.
- A white matte paper backdrop eliminates background color contamination.
- Read the strip at the exact manufacturer-stated time (not before, not after drying).
- For colorblind users, a smartphone color-picker app adds objective repeatability.
- Strips give ±0.5 pH accuracy at best.
Why pH Strip Soil Tests Often Fail at the Color-Reading Stage
pH strips work by changing color after contact with a liquid. When you test soil with pH strips, you are testing a soil-water slurry rather than dry soil itself. The strip’s indicator dyes (commonly bromothymol blue, methyl red, or phenol red blends) react to hydrogen-ion concentration in the liquid, and the resulting color is compared against a printed chart.
In theory, this is simple. In practice, the color difference between pH 6.0, 6.5, 7.0, and 7.5 can be as subtle as a 10–15% shift in hue angle on the green-to-blue spectrum. According to the Penn State Extension, even trained lab technicians can disagree by ±0.3 units on visual color comparison under inconsistent lighting.
The problem is that human color perception changes depending on the light source:
- A strip that looks green under warm 2700K indoor lighting may look more blue under bright 6500K daylight.
- A chart that looks neutral under one lamp may look yellow under another.
- Direct sunlight creates glare, shadows, and oversaturation.
- Soil particles stuck to the strip make the pad look muddy.
- The color of the surface beneath the strip (dark granite, wood, green tablecloth) shifts perceived hue.
This is why many people believe the strips are “inaccurate” when the real issue is poor color evaluation. If you want reliable results when using pH strips to test soil, you need to control the reading environment as much as the testing process itself.
What Gardeners Really Want When Testing Soil pH at Home
Most people searching for how to test soil pH with test strips want a cheap, fast, do-it-yourself answer. They may be:
- Preparing a new vegetable bed or raised planter
- Diagnosing yellowing leaves (chlorosis) on tomatoes, peppers, or hydrangeas
- Growing acid-loving plants like blueberries, azaleas, or rhododendrons
- Trying to understand why fertilizer does not seem to be working
- Deciding whether they need lime, sulfur, or a different amendment
They do not necessarily want to send a sample to a lab right away, but they also do not want a useless guess. The user intent behind these searches is practical: “Can I trust this method?” “Why does my strip color not match the chart?” “Am I reading it wrong?” “Is my soil acidic or alkaline?” “Do I need a meter instead?”
This guide answers those questions by improving the weakest link in the process: visual interpretation.
pH Strips vs. Digital Meters vs. Lab Tests: Which Should You Use?
| Method | Accuracy | Cost | Speed | Best For |
|---|---|---|---|---|
| pH Strips (narrow-range 4–9) | ±0.5 pH | $5–$15 for 100 strips | 2 minutes | Quick garden checks, beginners, budget testing |
| Digital pH Meter (calibrated) | ±0.1 pH | $20–$80 | 30 seconds | Repeated testing, container gardens, hydroponics |
| Chemical Drop Kit (e.g., LaMotte, Luster Leaf) | ±0.25 pH | $15–$50 | 5 minutes | Home gardeners wanting better accuracy than strips |
| University Extension Lab Test | ±0.05 pH | $10–$30 per sample | 1–3 weeks | Pre-amendment decisions, commercial growing, legal documentation |
Related: See our full soil analysis test kit comparison for in-depth reviews of LaMotte, Luster Leaf, and Rapitest kits.
What You Need Before You Test Soil with pH Strips
Before testing, gather the right supplies. You do not need expensive equipment, but a few simple items dramatically improve consistency:
- pH strips: Garden-range or narrow-range (pH 4–9), NOT a broad universal 1–14 strip. Narrow-range strips spread the color gradient across fewer pH units, making each 0.5 shift easier to distinguish.
- Distilled water: Available at any grocery store for under $2. Do NOT use tap water, spring water, or filtered water.
- Clean glass jar or beaker (no soap residue, no fertilizer residue)
- Plastic spoon or stir stick (metal can react with acidic samples)
- Timer (phone timer works)
- White matte printer paper (not glossy, not cream/ivory)
- Neutral daylight LED bulb (5000K–6500K) or access to bright indirect window light
- Smartphone with a color-picker app (optional, for colorblind users or uncertain readings)
How to Test Soil pH with Test Strips: Step-by-Step
-
Step 1: Collect a Representative Soil Sample
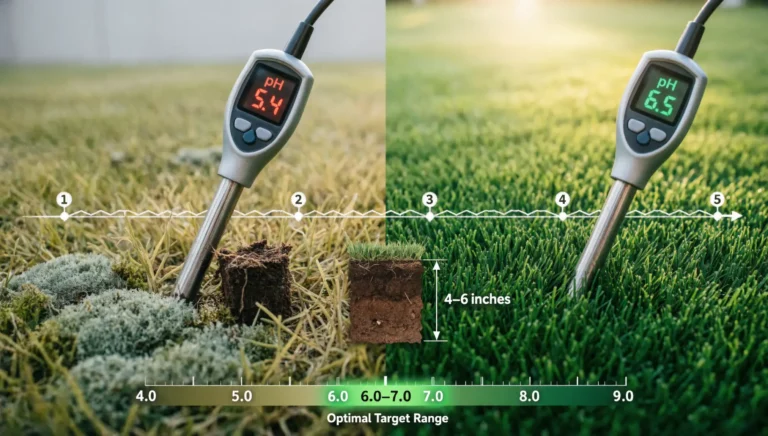
Do not test only the surface crust or one small spot. Remove mulch, leaves, stones, and visible debris. Using a clean trowel, take 5–8 small subsamples from the top 4–6 inches of soil across the area you care about (zigzag pattern across a bed or lawn section). Mix them together in a clean container. This composite approach gives you a useful average reading instead of a one-off result from an unusual spot.
-
Step 2: Prepare the Soil-Water Slurry
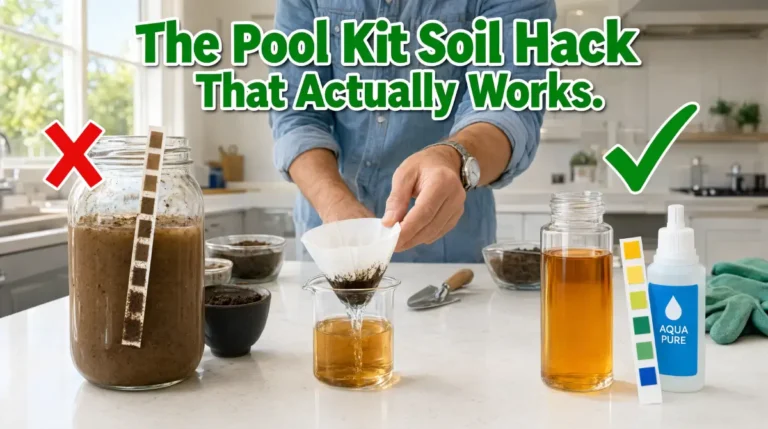
Place approximately 2 tablespoons of mixed soil into a clean glass jar. Add 2 tablespoons of distilled water (a 1:1 ratio by volume). Stir vigorously for 20–30 seconds to break up clumps. Then let the mixture settle undisturbed for 5 minutes. You want a relatively clear liquid layer on top to dip the strip into without smearing heavy mud onto the test pad.
Note: The USDA Natural Resources Conservation Service recommends a 1:1 soil-to-water ratio for home pH estimation. Some labs use 1:2 or a saturated paste, but for strip testing, 1:1 provides enough liquid while keeping the hydrogen-ion concentration representative.
-
Step 3: Dip the Strip Correctly
Dip only the colored test pad into the clear liquid layer. Do not rub it against soil sediment at the bottom. Hold it submerged for the time stated on the strip packaging , typically 2–5 seconds. Remove the strip and gently shake off one or two drops of excess liquid. Do not wipe, blot, or rub the pad with a cloth or paper towel; this physically removes indicator dye and distorts the color.
-
Step 4: Wait the Exact Read Time
This is critical. Most strips must be read after a specific interval , commonly 15, 30, or 60 seconds depending on brand. Set a phone timer. Do not read early (color still developing) and do not read late (strip drying, oxidizing, or darkening). A strip read at 5 minutes when the instructions say 15 seconds can shift by 0.5–1.0 pH units in perceived color.
-
Step 5: Compare on White Paper Under Neutral Light
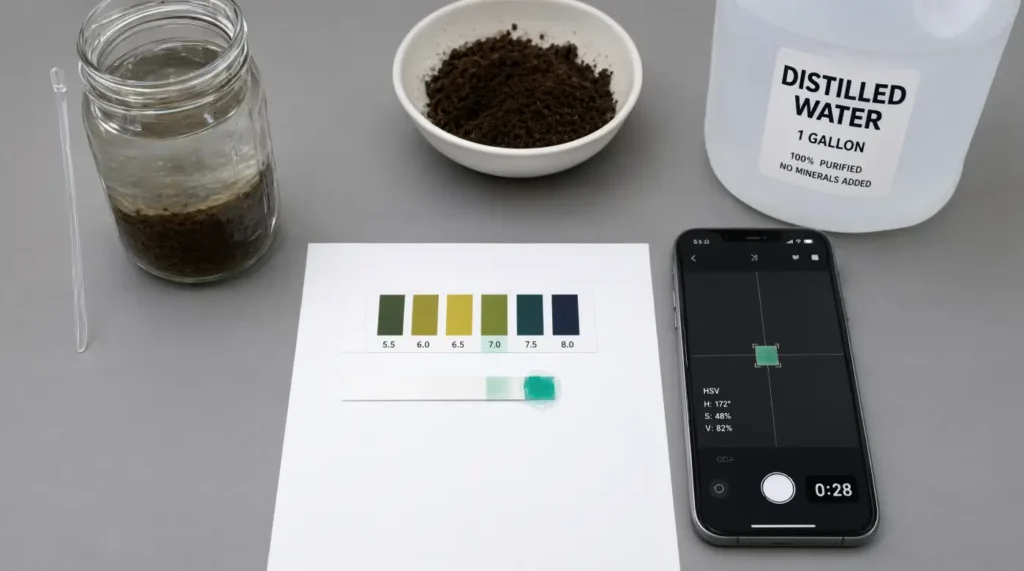
Immediately place the strip on a white matte sheet of paper. Place the manufacturer’s color chart directly beside it (not stacked, not overlapping). Ensure you are under neutral 5000K–6500K lighting with no direct sun glare, no shadows from your hand, and no colored surfaces nearby. View from directly above. Compare quickly , staring causes chromatic adaptation and makes subtle differences harder to detect.
The White Paper Backdrop Trick That Improves Accuracy
One of the easiest improvements when using pH strips to test soil is to use a plain white piece of paper as a backdrop. Place the pH strip on the paper. Place the color chart next to it. If you are photographing the result, put both the strip and the chart on the same white sheet.
The white paper does three important things:
- Isolates the test pad from background colors that distort perception. A dark granite countertop, green tablecloth, wooden cutting board, or soil-stained tray can shift perceived hue by making the strip appear warmer or cooler than it is.
- Gives your eyes a neutral reference point. Your visual cortex calibrates against surrounding colors. A neutral white field lets you judge the strip’s true hue.
- Helps smartphone apps interpret color consistently because the camera auto-white-balance has a clean reference to lock onto.
Use matte paper, not glossy photo paper. Glossy surfaces create specular reflections that confuse both eyes and cameras. Standard 20 lb printer paper works well. If the paper is cream, ivory, visibly yellowed, or has a blue “brightener” tint, use a different sheet. The goal is neutral D65 white, not warm or cool white.
Avoid Direct Sunlight Glare When Reading pH Strips
Natural light sounds ideal, but direct sunlight can cause serious reading errors:
- Creates specular glare on the wet strip surface
- Washes out color saturation, making differences invisible
- Casts hard shadows from your hand or the strip’s edge
- Makes the chart look different depending on viewing angle
- UV component can slightly alter indicator dye appearance
If testing outdoors: Move into open shade (under a tree canopy, beside a building’s north side, or under a white umbrella). The light should be bright but fully indirect.
If testing indoors: Avoid warm 2700K bulbs, colored bulbs, under-cabinet strips with a green or yellow cast, and dim evening light. The best indoor source is a neutral daylight-balanced LED at 5000K–6500K with a CRI (Color Rendering Index) above 90. Position the light above and slightly in front of the strip so no shadow falls across the pad.
How to Read Subtle Green and Blue Shifts Without Guessing
Many soil pH charts move from yellow/orange (acidic) → green (neutral) → blue/purple (alkaline). The most confusing readings happen around pH 6.0 to 7.5, where colors shift through green, teal, and green-blue. Small differences matter agronomically, but they are genuinely hard to see.
The “Bracketing” Technique:
- Instead of asking “Is this green or blue?”, compare the strip to the two closest chart patches.
- Ask: “Is it clearly closer to 6.5, or clearly closer to 7.0?”
- Eliminate the option that obviously does not match.
- If the strip appears genuinely halfway between two patches, record it as a range: pH 6.5–7.0. This is more scientifically honest than forcing a false-precision single number.
The “Double-Strip” Confirmation:
Test two strips from the same slurry and lay them side by side on the white paper. If both strips point to the same 0.5-unit range, your confidence increases significantly. If they differ by more than 0.5 units, discard both, remix the slurry with fresh distilled water in a clean jar, and retest. Persistent inconsistency suggests expired strips, contamination, or inadequate soil mixing.
Using a Smartphone Color-Calibration App for More Objective Readings
If you are colorblind, have difficulty distinguishing subtle green-to-blue shifts, or simply want a more repeatable reading, a smartphone color-picker or color-calibration app can help. The app does not chemically measure soil pH. It helps interpret the strip color more objectively, which is where most home testers struggle.
How to use this method correctly:
- Place the strip and pH chart on white matte paper under neutral 5000K+ lighting.
- Open your color app (e.g., Color Grab, Color Picker, or a dedicated pH-strip reader app).
- If the app allows, set a white-balance reference by pointing the camera at the blank white paper.
- Lock exposure and white balance in your camera so the image is not auto-brightened or color-shifted.
- Use the app’s live color picker to sample the center of the test pad.
- Note the HSV (Hue, Saturation, Value) reading. Hue angle is the most useful metric: yellow ≈ 50–60°, green ≈ 100–140°, blue ≈ 200–240°.
- Compare the strip’s hue angle to the chart patches’ hue angles for an objective match.
Limitations to understand: Camera sensors, auto-processing, screen calibration, and app quality all introduce variance. Use the app as a decision aid for repeatability, not as absolute laboratory proof. For high-value crops, blueberries, cannabis, hydroponic media, or any situation where a 0.5 pH error means plant damage, follow up with a calibrated digital pH meter or a professional soil analysis test kit.
Special Tips for Colorblind Gardeners
Colorblindness (most commonly red-green deficiency affecting ~8% of males) does not mean you cannot test soil with pH strips. It means you need a better system:
- Choose narrow-range pH paper (pH 4–9) with distinct yellow→green→blue transitions rather than red→orange→green charts.
- Use strong neutral 6500K lighting and a white backdrop to maximize contrast.
- Ask a second person to confirm the reading.
- Photograph the strip and chart together; compare later on a calibrated monitor.
- Use a color-identification app that outputs numeric HSV values or names the color (e.g., “teal,” “chartreuse,” “cerulean”) rather than relying on your subjective perception.
- If the chart relies heavily on red-green distinctions, switch brands. Some manufacturers use clearer yellow-green-blue separations.
- If frustration persists, invest in a digital pH meter ($20–$40) that gives a numeric readout with zero color interpretation needed.
Common Mistakes When Using pH Strips to Test Soil
| Mistake | Why It Skews Results | Fix |
|---|---|---|
| Using tap water | Dissolved CaCO₃, chlorine, or salts shift reading by 0.5–1.0 pH | Use distilled water only |
| Dipping into thick mud | Soil particles stain the pad, muddying the color | Let slurry settle 5 min; dip into clear liquid only |
| Reading too late (after drying) | Oxidation darkens the dye; color shifts alkaline | Set a timer; read at exact stated interval |
| Reading on dark/colored surface | Background hue contaminates perception | Always use white matte paper |
| Testing under warm/yellow light | Makes greens appear more yellow (acidic) | Use 5000K–6500K neutral daylight LED |
| Using expired or humidity-damaged strips | Dyes degrade; weak or no color change | Store in sealed container with desiccant; check expiry |
| Testing right after fertilizing or liming | Surface chemistry temporarily altered | Wait 2–4 weeks after amendment before retesting |
| Single-sample testing | One spot ≠ whole bed; pH varies spatially | Composite 5–8 subsamples from the area |
How Accurate Are pH Strips for Soil Testing?
pH strips can give a useful approximate soil pH within ±0.5 units under careful home conditions. In poor conditions (bad lighting, tap water, expired strips, muddy sample), the error can exceed ±1.0 unit.
Accuracy depends on:
- Strip quality and freshness (indicator dyes degrade with heat, humidity, and UV exposure)
- Water purity (distilled vs. tap)
- Soil composition (heavy clay, dark organic matter, and dissolved salts can tint the liquid)
- Timing precision (reading at 15s vs. 60s)
- Lighting and backdrop control
- Reader’s color discrimination ability
According to the USDA NRCS Soil Survey, soil pH can vary by 0.5–1.5 units within a single field depending on depth, organic matter content, and drainage. A strip test captures a snapshot; it does not replace a comprehensive lab analysis for buffer pH, cation exchange capacity, or micronutrient levels.
For general gardening decisions (choosing between acid-loving vs. neutral-preferring plants, deciding whether to add a small amount of compost), strips are often sufficient. For high-stakes decisions (commercial crop planning, large-scale lime or sulfur application, diagnosing persistent nutrient deficiency), confirm with a lab test or calibrated meter.
What Your Soil pH Result Means (And What to Do Next)
Soil pH measures hydrogen-ion activity on a 0–14 logarithmic scale. Each full unit represents a tenfold change in acidity. A reading of pH 5.0 is ten times more acidic than pH 6.0.
- pH below 6.0 (acidic): Common in high-rainfall regions, pine-needle mulched beds, and peat-heavy soils. Nutrients like phosphorus, calcium, and magnesium become less available. Aluminum and manganese toxicity risk increases.
- pH 6.0–7.0 (slightly acidic to neutral): The “sweet spot” for most vegetables, lawns, and ornamentals. Maximum nutrient availability.
- pH above 7.0 (alkaline): Common in arid regions, limestone-heavy soils, and areas with hard irrigation water. Iron, zinc, manganese, and copper availability drops. Chlorosis (yellow leaves, green veins) is a classic symptom.
🔧 What to Do With Your Result
- pH too low (below 6.0)? You likely need lime. Use our free Lime Rate Calculator to determine exactly how much pelletized or agricultural lime your soil needs based on your current pH, target pH, and soil type.
- pH too high (above 7.0)? You likely need sulfur. Read our guide on how to lower soil pH with elemental sulfur safely and effectively.
- Unsure if your reading is accurate? Compare methods in our soil analysis test kit guide or invest in a calibrated pH meter for repeatable readings.
Best Conditions and Timing for Testing Soil pH with Strips
For the most representative home results:
- Test when soil is moderately moist (not bone-dry, not freshly flooded). If you watered heavily within 24 hours, wait.
- Wait 3–4 weeks after applying lime, sulfur, fertilizer, or fresh compost before testing, unless you are specifically measuring the amendment’s effect.
- Best seasons: Early spring (before planting) or late fall (after harvest). Avoid testing during peak summer heat when microbial activity and evaporation can shift surface readings.
- Test at root-zone depth (4–6 inches for lawns and annuals; 6–12 inches for trees and shrubs), not just the surface crust.
- Retest annually if you are actively amending soil, or every 2–3 years for established gardens.
Quick Checklist for Accurate pH Strip Readings
- ☐ Fresh narrow-range pH strips (4–9), stored sealed with desiccant
- ☐ Composite soil sample from 5–8 spots, top 4–6 inches, debris removed
- ☐ Clean glass jar, plastic stir stick
- ☐ Distilled water (NOT tap, spring, or filtered)
- ☐ 1:1 soil-to-water ratio, stirred 20–30 seconds
- ☐ Settled 5 minutes before dipping
- ☐ Strip dipped into clear liquid only (no mud contact)
- ☐ Timer set to manufacturer’s stated read time
- ☐ Strip placed on white matte paper (NOT glossy, NOT cream)
- ☐ Neutral 5000K–6500K lighting, no direct sun, no shadows
- ☐ Chart placed beside strip (not stacked)
- ☐ Read quickly; record as range if between two patches
- ☐ Second strip confirms result (±0.5 agreement)
- ☐ If colorblind or uncertain: smartphone color-picker app used
- ☐ Result logged with date, location, and conditions
Final Thoughts: The Strip Is Only Half the Test
When people struggle to test soil with pH strips, they often blame the strip. But in most cases, the real failure point is color interpretation under poor conditions. Using pH strips to test soil can work remarkably well if you control the variables: clean composite sample, distilled water, correct ratio, proper timing, white backdrop, neutral lighting, and no glare.
If you are colorblind or find the green-blue transitions frustrating, a smartphone color-calibration app adds objectivity and repeatability. Just remember: the app supports your judgment; it does not replace careful technique.
For quick garden decisions , “Is my soil acidic enough for blueberries?” or “Do I need to lime the lawn this fall?” , pH strips are a practical, affordable first step. For precise, high-stakes growing, confirm with a calibrated meter or professional lab test.
The goal is not a perfect laboratory number on the first try. The goal is to eliminate the most common errors, understand what the strip is genuinely telling you, and know when a more accurate test is worth the investment. With better lighting, a white paper, and a smarter reading routine, you can stop misreading the colors and make confident soil pH decisions today.