Understanding your soil is the absolute foundation of successful gardening, landscaping, and farming. However, with dozens of options on the market, selecting the right soil analysis test kit can feel overwhelming. The secret to choosing correctly lies in understanding the critical trade-off between accuracy, convenience, and your specific agricultural goals.
In this comprehensive, expert-backed guide, we will walk you through the complete spectrum of soil testing options. From rapid pH test strips to advanced digital tools and professional laboratory analysis, we will help you identify exactly which soil test kit professional growers and home gardeners trust to match your specific needs, budget, and accuracy requirements.
Table of Contents
- The Accuracy vs. Convenience Spectrum
- The Ultimate Soil Sampling Protocol
- pH Test Strips: Maximum Convenience
- Chemical Drop Kits: The Professional’s Choice
- Digital pH Meters: Precision Tools
- Professional Laboratory Testing
- Decoding Your Results: What to Do Next
- Complete Comparison Chart
- How to Choose Your Perfect Test
- Frequently Asked Questions
The Accuracy vs. Convenience Spectrum: Finding Your Perfect Match
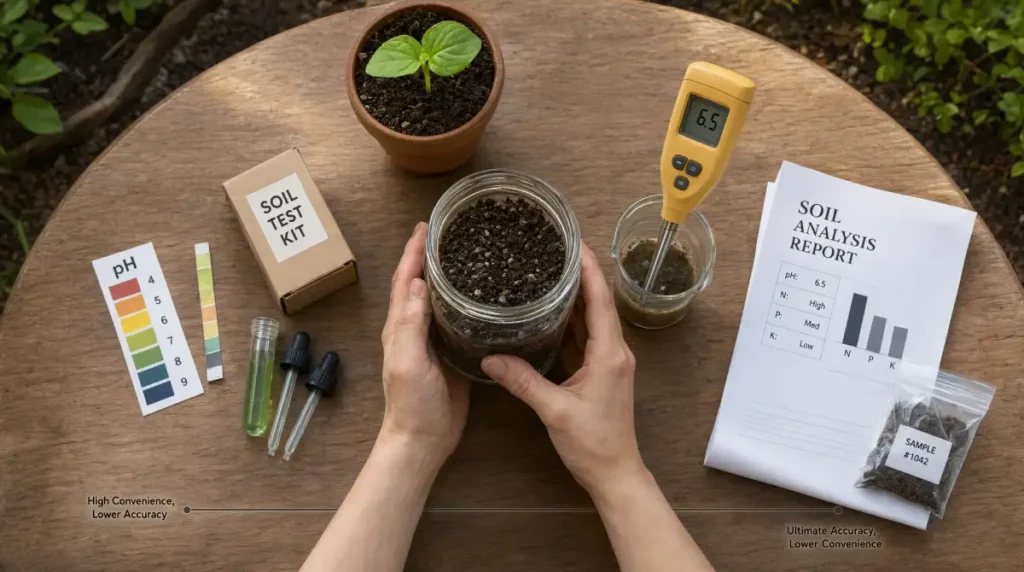
Not all soil testing methods are created equal. The key to choosing the right soil test kit professional or consumer-grade option is understanding where your specific situation falls on the accuracy-convenience spectrum. A tool that is perfect for a hydroponic grower will be entirely wrong for a casual raised-bed gardener.
| Testing Method | Convenience Level | Accuracy Range | Time to Result | Estimated Cost | Best Use Case |
|---|---|---|---|---|---|
| pH Test Strips | High | Low (±0.5-1.0 pH) | < 2 minutes | $10 – $25 | Quick, rough checks |
| Chemical Drop Kits (Best Value) | Medium | High (±0.1-0.2 pH) | 10 – 15 minutes | $50 – $150 | Regular, reliable monitoring |
| Digital pH Meters | Medium-High | Very High (±0.01-0.05 pH) | 2 – 3 minutes | $30 – $300+ | Frequent, precise tracking |
| Laboratory Testing | Low | Ultimate (Gold Standard) | 5 – 14 days | $15 – $500+ | Baseline & commercial analysis |
Ask yourself these three critical questions to find your position:
- How quickly do you need results? Minutes favor the left side of the spectrum; days allow you to move to the right.
- What is your accuracy requirement? Are you looking for general trends (acidic vs. alkaline) or precise measurements to calculate exact lime/sulfur application rates?
- What is your budget and testing frequency? From $10 to $500+, each tier serves different long-term financial and operational needs.
The Ultimate Soil Sampling Protocol (Crucial First Step)
Before you even open a soil analysis test kit, you must understand that the test is only as accurate as the sample you provide. A $300 digital meter will give you wildly inaccurate data if you test a single, unrepresentative clump of dirt. Professional agronomists follow a strict composite sampling protocol.
The “W-Pattern” Sampling Method
- Define the Zone: Test areas separately (e.g., lawn, vegetable garden, flower beds). Do not mix them.
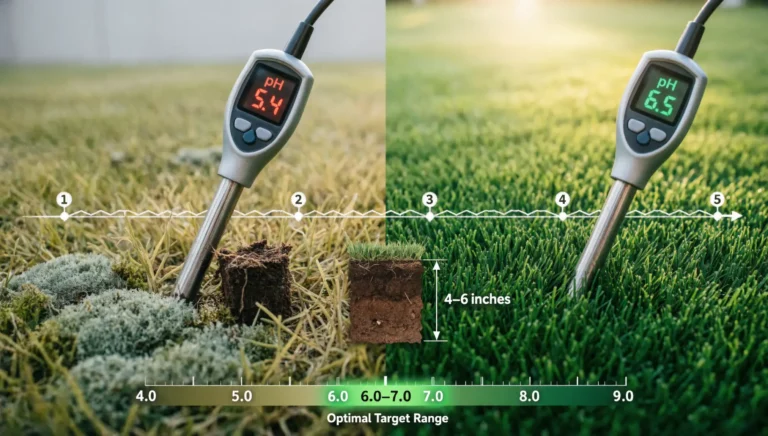
- Clear the Surface: Remove grass, mulch, or debris from the top 1-2 inches of soil.
- Take Multiple Cores: Using a clean stainless steel trowel or soil probe, take 8 to 12 small samples from a “W” or “Z” pattern across the zone. Sample at root depth (typically 4-6 inches for gardens, 2-3 inches for lawns).
- Composite the Sample: Place all 8-12 sub-samples into a clean, non-reactive plastic bucket. Break up clods and mix thoroughly.
- Extract the Test Portion: Take roughly 1 to 2 cups of this thoroughly mixed composite soil for your actual test. Discard the rest or return it to the garden.
Expert Note: Never use galvanized steel or brass tools, as they can leach zinc or copper into the sample, skewing micronutrient results.
pH Test Strips: Maximum Convenience, Basic Accuracy
pH test strips (litmus paper) represent the simplest form of a soil analysis test kit. You mix soil with distilled water, dip the strip, wait 30-60 seconds, and compare the resulting color to a provided chart.
| Advantages (✅) | Limitations (❌) |
|---|---|
|
|
Our Verdict: Use pH strips if you are just starting out, need a rapid general reading, or want to test multiple distinct locations quickly on a shoestring budget. Skip them if you need precise measurements, are growing highly pH-sensitive plants (like blueberries or azaleas), or are calculating exact amendment rates.
Chemical Drop Kits: The Professional’s Choice for Home Use
Chemical drop kits utilize colorimetric analysis, the exact same foundational principle employed by university agricultural laboratories. You add soil to a test tube, mix with a provided extraction solution, add specific chemical reagent drops, and compare the resulting color to a highly detailed, laminated chart.
| Advantages (✅) | Limitations (❌) |
|---|---|
|
|
Our Verdict: Chemical drop kits represent the absolute sweet spot for 80% of gardeners. They offer professional-grade accuracy at a fraction of laboratory costs. If you are committed to understanding and improving your soil long-term, this is the soil test kit professional growers choose for routine monitoring.
Digital pH Meters: Precision at Your Fingertips
A high-quality ph soil tester meter uses an electronic glass electrode to measure hydrogen ion activity in the soil. When used correctly, it provides an instant, objective digital readout, eliminating the guesswork of color-matching entirely.
Direct-Read Probes vs. The Slurry Method
| Feature | Direct-Read Probes (Avoid for Soil) | Slurry Method Meters (Highly Recommended) |
|---|---|---|
| How it Works | Inserted directly into damp ground. | Tests a soil-to-distilled-water mixture. |
| Speed | Extremely fast (30 seconds). | Requires 2-3 minutes of sample prep. |
| Accuracy | Highly inaccurate in solid soil (±0.2-0.5). | Highly accurate (±0.01-0.05). |
| Probe Safety | High risk of probe contamination and damage. | Protects the delicate glass electrode. |
| Lab Correlation | Poor. | Matches professional laboratory protocols. |
Calibration: The Non-Negotiable Key to Accuracy
⚠️ Critical Expert Warning: A digital ph soil tester meter is only as accurate as its last calibration. pH electrodes naturally drift over time due to protein buildup, drying, and temperature fluctuations. Professional users calibrate before every single use with at least two buffer solutions (typically pH 4.01 and 7.00). Without proper calibration, even a $300 professional meter can be less accurate than a $10 test strip.
Professional Laboratory Testing: The Gold Standard
When absolute certainty is required, professional laboratory services analyze your soil using standardized, peer-reviewed methodologies (such as the Mehlich-3 or Bray extraction methods).
Comprehensive Laboratory Testing Parameters
| Category | Parameters Tested | Why It Matters for Your Soil |
|---|---|---|
| Macronutrients | Nitrogen (N), Phosphorus (P), Potassium (K), Calcium (Ca), Magnesium (Mg), Sulfur (S) | Primary building blocks for plant growth, root development, and fruiting. |
| Micronutrients | Iron (Fe), Manganese (Mn), Zinc (Zn), Copper (Cu), Boron (B), Molybdenum (Mo) | Essential in trace amounts; deficiencies cause specific leaf chlorosis and stunting. |
| Soil Properties | pH, Organic Matter %, Cation Exchange Capacity (CEC), Soil Texture, Electrical Conductivity (EC) | Determines nutrient holding capacity, drainage, and overall soil health biology. |
| Optional Add-ons | Heavy metals, Pesticide residues, Soil respiration, Microbial biomass | Crucial for organic certification, safety, and advanced biological farming. |
Our Verdict: Laboratory testing is essential when you need comprehensive data, are making major financial investments in land, or require official documentation. Pro Strategy: Get a professional lab test once to establish your baseline, then use a high-quality chemical drop kit for regular, ongoing monitoring.
Decoding Your Results: What to Do Next
Obtaining the data is only half the battle; knowing how to act on it is what separates successful growers from the rest. Here is a quick reference table for common pH scenarios:
| pH Range | Soil Condition | Plant Impact & Nutrient Availability | Recommended Action |
|---|---|---|---|
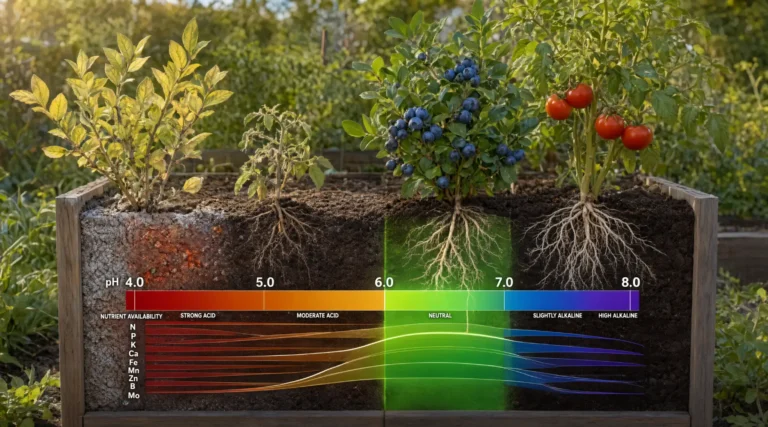
| Below 5.5 | Highly Acidic | Nutrient lockout. Aluminum/manganese may reach toxic levels. Phosphorus, calcium, and magnesium become unavailable. | Apply agricultural lime or pelletized lime based on your soil’s Cation Exchange Capacity (CEC). |
| 6.0 to 7.0 | Ideal Range (Slightly Acidic to Neutral) | The “sweet spot” for most vegetables and lawns. Microbial activity is at its peak; nutrient availability is maximized. | Maintain with annual organic matter additions. No major amendments needed. |
| 7.1 to 7.5 | Mildly Alkaline | Generally fine for most plants, but iron and manganese availability begins to drop slightly. | Monitor acid-loving plants. Use acidifying fertilizers if growing azaleas or blueberries. |
| Above 7.5 | Alkaline | Iron, manganese, and phosphorus become chemically bound, leading to severe chlorosis (yellowing leaves). | Apply elemental sulfur or acidifying fertilizers (like ammonium sulfate) to gradually lower the pH. |
Complete Comparison: All Testing Methods Side-by-Side
| Feature | pH Strips | Chemical Kits | Digital Meters | Laboratory |
|---|---|---|---|---|
| Initial Cost | $10 – $25 | $50 – $150 | $30 – $300+ | $15 – $500+ |
| Time to Result | 1 – 2 minutes | 10 – 15 minutes | 2 – 3 minutes (slurry) | 5 – 14 days |
| pH Accuracy | ±0.5 – 1.0 | ±0.1 – 0.2 | ±0.01 – 0.05 | ±0.01 |
| Nutrient Testing | No | Yes (N-P-K) | No (pH only usually) | Yes (Complete Panel) |
| Calibration Needed | No | No | Yes, strictly | N/A |
| Best Use Case | Quick, rough checks | Regular, reliable monitoring | Frequent, precise tracking | Baseline & commercial |
How to Choose Your Perfect Soil Testing Method
Still unsure? Match your specific grower profile to our expert recommendations below:
| Grower Profile | Primary Needs & Goals | Recommended Tool | Estimated Investment |
|---|---|---|---|
| 🌱 The Beginner Gardener | Curiosity, low budget, learning the basics of soil health. | pH Test Strips or Basic Chemical Kit | $10 – $50 |
| 🥕 The Serious Home Gardener | Grow vegetables annually, want to optimize yields and track N-P-K. | LaMotte Chemical Drop Kit | $75 – $95 |
| 🫐 The Specialty Grower | Grow pH-sensitive plants (blueberries, orchids, hydrangeas). | Digital ph soil tester meter (Apera or Hanna) | $80 – $150 |
| 🌾 The Small Farmer / Homesteader | Manage 1-10 acres, need reliable, actionable, comprehensive data. | Lab test annually + Chemical kit monthly | $50 (Lab) + $80 (Kit) |
| 💧 The Hydroponic Grower | Soilless growing, test nutrient solutions daily or weekly. | Professional Digital Meter with ATC | $100 – $200 |
Expert Tips for Flawless Soil Testing
- 📍 Sample Correctly: Take 10-15 subsamples from different spots, mix thoroughly, and test the composite. One sample from one spot tells you nothing about your overall soil.
- 🧪 Use Distilled Water Only: Tap water contains minerals, chlorine, and its own pH. Always use distilled or deionized water for soil testing to avoid heavily skewed results.
- 📅 Test at the Right Time: Test soil 3-6 months before planting. This gives you ample time to adjust pH (which is a slow chemical process) and apply amendments properly.
- 🔄 Test Annually: Soil chemistry changes over time. Test at the same time each year (fall is ideal) to track trends and measure the actual impact of your amendments.
- 🌡️ Mind the Temperature: Digital meters need temperature compensation. If your meter doesn’t have Automatic Temperature Compensation (ATC), test your slurry at room temperature (68-77°F).
- 📊 Keep Meticulous Records: Document every test: date, location, weather, results, and amendments applied. This historical data is invaluable for long-term soil management.
Final Thoughts: Match the Tool to Your Needs
There is no single “best” soil testing method, only the best method for your specific situation.
- Choose pH Strips If: You are just starting out, your budget is very tight, and you only need general trends.
- Choose Chemical Kits If: You are serious about long-term soil health, want 94% lab accuracy at home, and need N-P-K plus pH data. (⭐ Best overall value for most gardeners)
- Choose Digital Meters If: You test frequently (weekly or more), need ±0.05 precision, and are committed to regular calibration.
- Choose Laboratory If: You need comprehensive, baseline data, are farming commercially, or require official documentation.
Start with the method that matches your current needs, then upgrade as your gardening journey progresses. Remember: any soil test is exponentially better than guessing. Understanding your soil is the first, most critical step toward growing healthier plants, achieving higher yields, and building a more sustainable growing environment.
Our top recommendation for most growers: Start with a LaMotte chemical drop kit for the best balance of accuracy, comprehensiveness, and long-term value. Test annually, keep meticulous records, and watch your garden thrive.